lenet5简易实现 朱子康(spzeno@163.com )
二零二二年七月十六日
摘要:本报告为2022级ERCESI新硕士研究生培训第一阶段LAB1报告。GitHub Repo
实验内容概述 纯c实现lenet5,不得调用第三方库,权重数据已经给出。
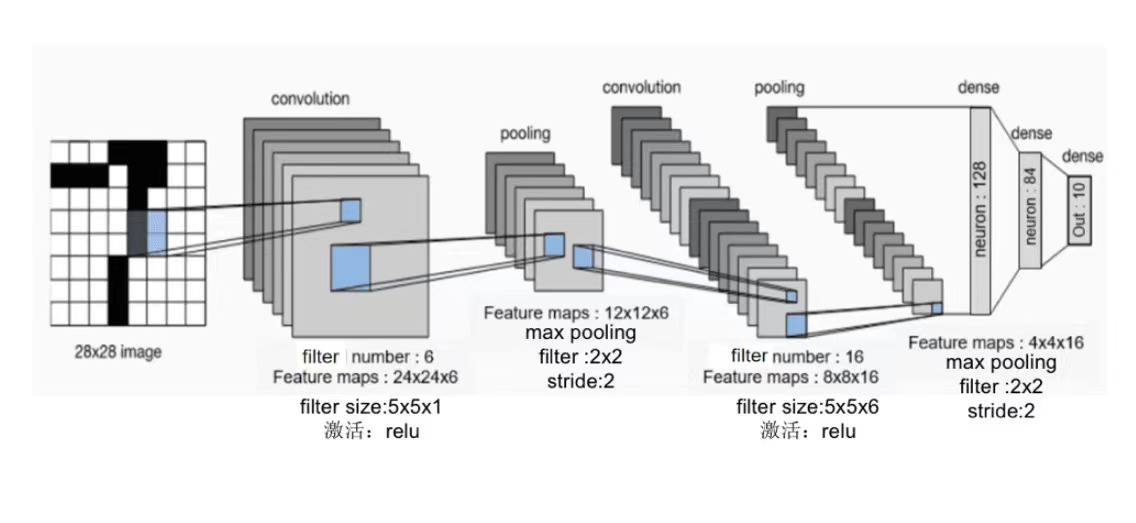
lenet5结构 LeNet 是几种神经网络的统称,它们是 Yann LeCun 等人在 1990 年代开发的。一般认为,它们是最早的卷积神经网络 (Convolutional Neural Networks, CNNs)。模型接收灰度图像,并输出其中包含的手写数字。LeNet 包含了以下三个模型:
LeNet-1:5 层模型,一个简单的 CNN。
LeNet-4:6 层模型,是 LeNet-1 的改进版本。
LeNet-5:7 层模型,最著名的版本。
本次实现的lenet5模型的结构如下图所示。
参数分析
Layer
Output Size
Weight Size
Input
1 x 28 x 28
Conv(C_out=6,K=5,P=0,S=1)
6 x 24 x 24
6 x 1 x 5 x 5
ReLU
6 x 24 x 24
MaxPool(K=2,S=2)
6 x 12 x 12
Conv(C_out=16,K=5,P=0,S=1)
16 x 8 x 8
16 x 6 x 5 x 5
ReLU
16 x 8 x 8
MaxPool(K=2,S=2)
16 x 4 x 4
Flatten
256
Linear(256->128)
128
256*128
ReLU
128
Linear(128->84)
84
128*84
ReLU
84
Linear(84->10)
10
84*10
ReLU
10
算法及流程 待测试集合处理 由于png图片采用了从LZ77派生的无损数据压缩算法且每个pixel由RGB和α通道值表示,纯c语言读取png图片并转换为位图难度较大,因此我们使用如下Python脚本对20张png图片进行预处理,得到mnist ubyte格式(不包含头部)的image-ubyte文件和label-ubyte文件。
1
2
3
4
5
6
7
8
9
10
11
12
13
14
15
16
17
18
19
20
21
22
23
24
25
26
27
28
29
import osfrom PIL import Imagefrom array import *dirname = './image' data_image = array('B' ) data_label = array('B' ) FileList = [] for filename in os.listdir(dirname): if filename.endswith(".png" ): FileList.append(os.path.join(dirname,filename)) for filename in FileList: label = int (filename.split('/' )[2 ][0 ]) Im = Image.open (filename) pixel = Im.load() width, height = Im.size for x in range (0 ,width): for y in range (0 ,height): data_image.append(pixel[y,x]) data_label.append(label) output_file = open ('image-ubyte' , 'wb' ) data_image.tofile(output_file) output_file = open ('label-ubyte' , 'wb' ) data_label.tofile(output_file) output_file.close()
将COUNT_TEST个ubyte格式的28x28 8bit灰度图数据存储在全局变量uint8 imageSet[COUNT_TEST][28][28];,相应的标签存储在uint8 labelSet[COUNT_TEST];,涉及到的读取函数如下
1
2
3
4
5
6
7
8
9
10
11
12
13
int read_data (const char data_file[], const char label_file[]) { FILE* fp_image = fopen(data_file, "rb" ); FILE* fp_label = fopen(label_file, "rb" ); if (!fp_image || !fp_label) return 1 ; fseek(fp_image, 0 , SEEK_SET); fseek(fp_label, 0 , SEEK_SET); fread(imageSet, sizeof (*imageSet) * COUNT_TEST, 1 , fp_image); fread(labelSet, COUNT_TEST, 1 , fp_label); fclose(fp_image); fclose(fp_label); return 0 ; }
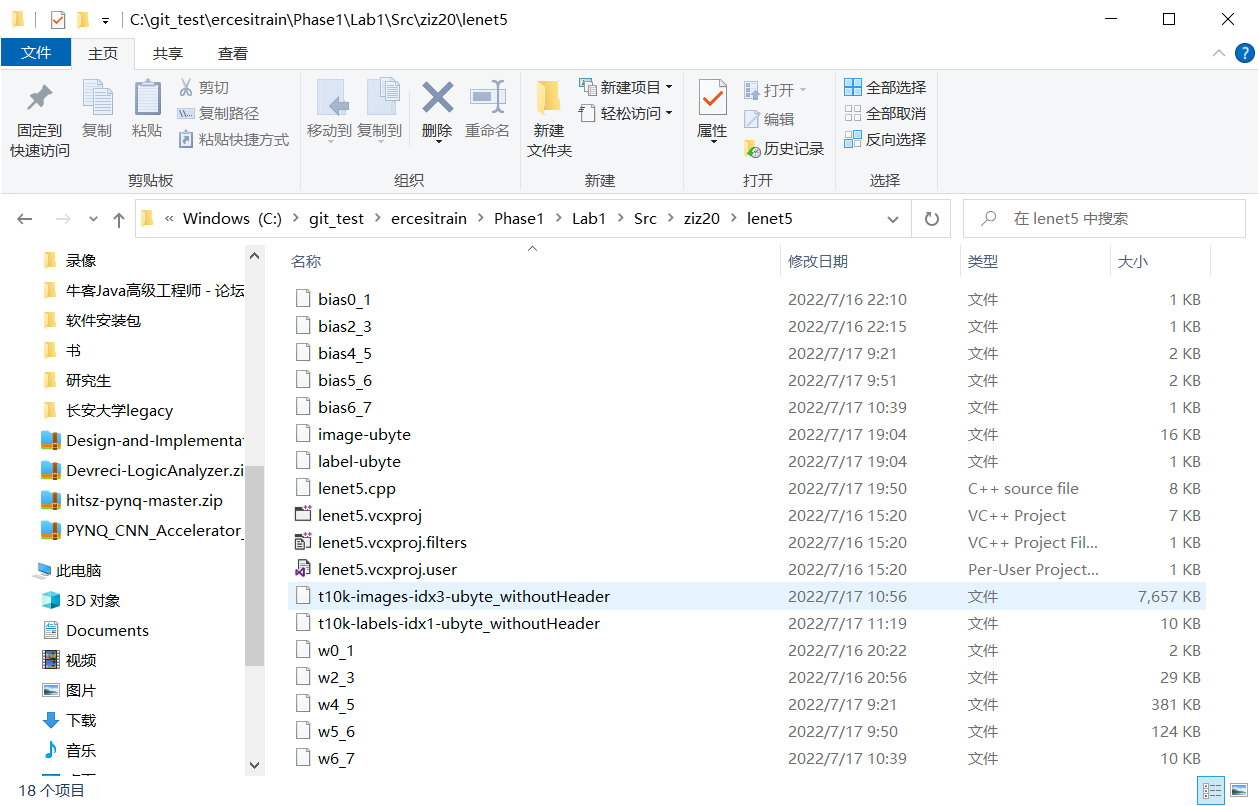
预处理权重数据并读取 c1、c2、d1、d2、d3权重数据的最后一列为bias数据,为了方便我们将最后一列提取出来,预处理权重数据得到
c1层对应的卷积w0_1和bias0_1
c2层对应的卷积w2_3和bias2_3
d1层对应的卷积w4_5和bias4_5
d2层对应的卷积w5_6和bias5_6
d3层对应的卷积w6_7和bias6_7
预处理得到的数据在源代码文件夹下。
使用全局变量存储权重数据,如下所示。
1 2 3 4 5 6 7 8 9 10 11 12 13 14 15 16 17 18 19 20 21 22 23 24 #define INPUT 1 #define LAYER1 6 #define LAYER2 6 #define LAYER3 16 #define LAYER4 16 #define LAYER5 128 #define LAYER6 84 #define LAYER7 10 #define LENGTH_KERNEL_0_1 5 #define LENGTH_KERNEL_2_3 5 #define LENGTH_KERNEL_4_5 4 #define LENGTH_KERNEL_5_6 1 #define LENGTH_KERNEL_6_7 1 double weight0_1[INPUT][LAYER1][LENGTH_KERNEL_0_1][LENGTH_KERNEL_0_1];double weight2_3[LAYER2][LAYER3][LENGTH_KERNEL_2_3][LENGTH_KERNEL_2_3];double weight4_5[LAYER4][LAYER5][LENGTH_KERNEL_4_5][LENGTH_KERNEL_4_5];double weight5_6[LAYER5][LAYER6][LENGTH_KERNEL_5_6][LENGTH_KERNEL_5_6];double weight6_7[LAYER6][LAYER7][LENGTH_KERNEL_6_7][LENGTH_KERNEL_6_7];double bias0_1[LAYER1];double bias2_3[LAYER3];double bias4_5[LAYER5];double bias5_6[LAYER6];double bias6_7[LAYER7];
接下来从预处理得到的数据文件中读取数据到上述保存权重数据的全局变量中,为了方便起见,使用了宏函数如下,举例来说,当需要读取c1层的权重数据时,只需readWeightMat("w0_1",LENGTH_KERNEL_0_1,INPUT,weight0_1); readBias("bias0_1",bias0_1);即可。
需要注意的是,由于提供的权重数据的组织形式和上述定义的保存权重数据的全局变量的组织形式的差异,我们需要根据当前读取索引idx确定当前读取到的权重值的存储位置 ,也即四维数组w的4个下标的表达式。
1 2 3 4 5 6 7 8 9 10 11 12 13 14 15 16 17 18 19 20 21 22 23 24 #define readWeightMat(FILE_MAT, KERNELSIZE, frontLayerSize,w) \ { \ FILE* f = fopen(FILE_MAT, "r" ); \ if (!f) return 1; \ double tmp = 0; \ int idx = 0; \ while (fscanf(f, "%lf" , &tmp) != EOF) { \ w[idx / KERNELSIZE / KERNELSIZE % frontLayerSize][idx / KERNELSIZE / KERNELSIZE / frontLayerSize][idx / KERNELSIZE % KERNELSIZE][idx % KERNELSIZE] = tmp; \ idx++; \ } \ fclose(f); \ } #define readBias(FILE_MAT, w) \ { \ FILE* f = fopen(FILE_MAT, "r" ); \ if (!f) return 1; \ double tmp = 0; \ int idx = 0; \ while (fscanf(f, "%lf" , &tmp) != EOF) { \ w[idx++] = tmp; \ } \ fclose(f); \ }
predict 循环读取imageSet每一张待测试图到input,predict图片对应的值并与label进行比较。
使用全局变量存储各层的特征图,如下所示。
1 2 3 4 5 6 7 8 9 10 11 12 13 14 15 16 17 #define LENGTH_FEATURE0 28 #define LENGTH_FEATURE1 (LENGTH_FEATURE0 - LENGTH_KERNEL_0_1 + 1) #define LENGTH_FEATURE2 (LENGTH_FEATURE1 >> 1) #define LENGTH_FEATURE3 (LENGTH_FEATURE2 - LENGTH_KERNEL_2_3 + 1) #define LENGTH_FEATURE4 (LENGTH_FEATURE3 >> 1) #define LENGTH_FEATURE5 (LENGTH_FEATURE4 - LENGTH_KERNEL_4_5+ 1) #define LENGTH_FEATURE6 1 #define LENGTH_FEATURE7 1 double input[INPUT][LENGTH_FEATURE0][LENGTH_FEATURE0];double layer1[LAYER1][LENGTH_FEATURE1][LENGTH_FEATURE1];double layer2[LAYER2][LENGTH_FEATURE2][LENGTH_FEATURE2];double layer3[LAYER3][LENGTH_FEATURE3][LENGTH_FEATURE3];double layer4[LAYER4][LENGTH_FEATURE4][LENGTH_FEATURE4];double layer5[LAYER5][LENGTH_FEATURE5][LENGTH_FEATURE5];double layer6[LAYER6][LENGTH_FEATURE6][LENGTH_FEATURE6];double layer7[LAYER7][LENGTH_FEATURE7][LENGTH_FEATURE7];
predict函数如下所示
1
2
3
4
5
6
7
8
9
10
11
12
13
14
15
16
17
18
19
20
21
22
23
24
25
26
27
28
29
uint8 Predict () { memset (layer1, 0 , LAYER1 * LENGTH_FEATURE1 * LENGTH_FEATURE1 * sizeof (double )); memset (layer2, 0 , LAYER2 * LENGTH_FEATURE2 * LENGTH_FEATURE2 * sizeof (double )); memset (layer3, 0 , LAYER3 * LENGTH_FEATURE3 * LENGTH_FEATURE3 * sizeof (double )); memset (layer4, 0 , LAYER4 * LENGTH_FEATURE4 * LENGTH_FEATURE4 * sizeof (double )); memset (layer5, 0 , LAYER5 * LENGTH_FEATURE5 * LENGTH_FEATURE5 * sizeof (double )); memset (layer6, 0 , LAYER6 * LENGTH_FEATURE6 * LENGTH_FEATURE6 * sizeof (double )); memset (layer7, 0 , LAYER7 * LENGTH_FEATURE7 * LENGTH_FEATURE7 * sizeof (double )); CONVOLUTION_FORWARD(input, layer1, weight0_1, bias0_1); SUBSAMP_MAX_FORWARD(layer1, layer2); CONVOLUTION_FORWARD(layer2, layer3, weight2_3, bias2_3); SUBSAMP_MAX_FORWARD(layer3, layer4); CONVOLUTION_FORWARD(layer4, layer5, weight4_5, bias4_5); CONVOLUTION_FORWARD(layer5, layer6, weight5_6, bias5_6); CONVOLUTION_FORWARD(layer6, layer7, weight6_7, bias6_7); int ans = 0 ; double maxValue = layer7[ans][0 ][0 ]; for (int i = 1 ; i < 10 ; i++) { if (layer7[i][0 ][0 ] > maxValue) { maxValue = layer7[i][0 ][0 ]; ans = i; } } return ans; }
宏函数CONVOLUTION_FORWARD和SUBSAMP_MAX_FORWARD如下所示。SUBSAMP_MAX_FORWARD使用的池化参数K=2,S=2,进行最大值采样。CONVOLUTION_FORWARD用于对上一层卷积得到下一层,其原理(循环次序)为:
输出层的第y张图
输入层的第x张图
(x,y)确定需要使用的权重数组,计算输入层的第y张图贡献给输出层的第x张图的每个pixel的卷积值的累加量
1 2 3 4 5 6 7 8 9 10 11 12 13 14 15 16 17 18 19 20 21 22 23 24 25 26 27 28 29 30 31 32 33 34 35 36 37 38 39 #define CONVOLUTE_VALID(input,output,weight) \ { \ FOREACH(o0,GETLENGTH(output)) \ FOREACH(o1,GETLENGTH(*(output))) \ FOREACH(w0,GETLENGTH(weight)) \ FOREACH(w1,GETLENGTH(*(weight))) \ (output)[o0][o1] += (input)[o0 + w0][o1 + w1] * (weight)[w0][w1]; \ } #define CONVOLUTION_FORWARD(input,output,weight,bias) \ { \ for (int x = 0; x < GETLENGTH(weight); ++x) \ for (int y = 0; y < GETLENGTH(*weight); ++y) \ CONVOLUTE_VALID(input[x], output[y], weight[x][y]); \ FOREACH(j, GETLENGTH(output)) \ FOREACH(i, GETCOUNT(output[j])) \ ((double *)output[j])[i] = relu(((double *)output[j])[i] + bias[j]); \ } #define SUBSAMP_MAX_FORWARD(input,output) \ { \ const int len0 = GETLENGTH(*(input)) / GETLENGTH(*(output)); \ const int len1 = GETLENGTH(**(input)) / GETLENGTH(**(output)); \ FOREACH(i, GETLENGTH(output)) \ FOREACH(o0, GETLENGTH(*(output))) \ FOREACH(o1, GETLENGTH(**(output))) \ { \ int x0 = 0, x1 = 0, ismax; \ FOREACH(l0, len0) \ FOREACH(l1, len1) \ { \ ismax = input[i][o0*len0 + l0][o1*len1 + l1] > input[i][o0*len0 + x0][o1*len1 + x1];\ x0 += ismax * (l0 - x0); \ x1 += ismax * (l1 - x1); \ } \ output[i][o0][o1] = input[i][o0*len0 + x0][o1*len1 + x1]; \ } \ }
为了尽可能复用上述CONVOLUTION_FORWARD宏函数,我们将最后三层flat层也表示成三维数组,即layer5、layer6、layer7。
实验步骤 环境 vs2022 Debug x64
win10
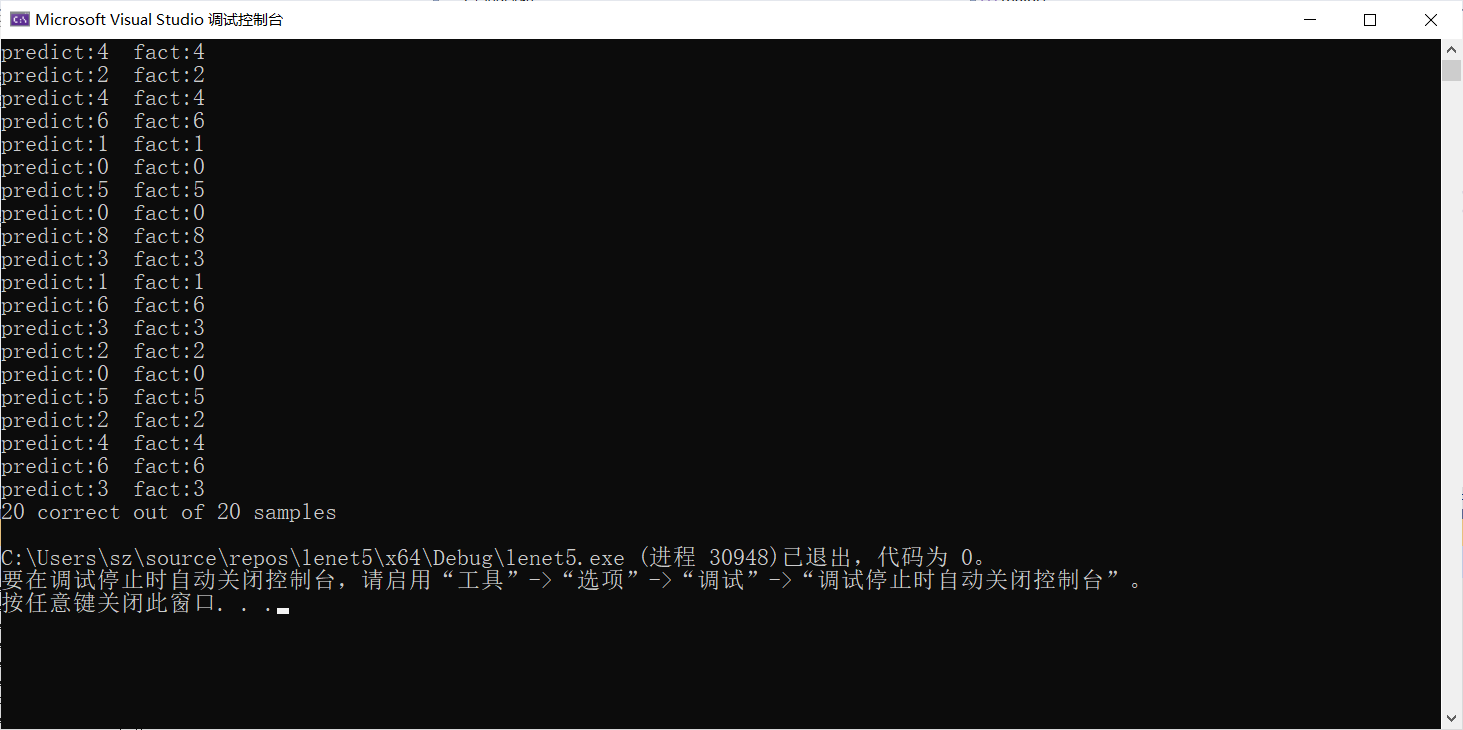
测试结果 20张png测试集 使用Lab1/Data/lenet_weights提供的参数构建的lenet5网络,对20张png处理得到的测试集,得到的测试结果如下所示。
原始mnist测试集 使用Lab1/Data/lenet_weights提供的参数构建的lenet5网络,mnist t10k-images-idx3-ubyte作为测试集,得到的测试结果如下所示。
额外测试 反相处理测试集 读出每张mnist图时,将每个像素的值进行255-灰度值处理并赋值给input,进行predict得到如下结果。
轴对称处理测试集
可以发现反色和轴对称处理会导致权重数据失效。
REFERENCE LeNet-5 研习
LeNet:第一个卷积神经网络
LeNet-5,Use C Program Language Without Any 3rd Library
MNIST数据集的格式以及读取方式
PNG文件格式详解
THE MNIST DATABASE


